Teaching Drums Online

In March 2020 the UK went into Lockdown due to COVID-19. As a result, businesses of all scales and self-employed workers had to change the way they operate or, in some cases, ceased to be able to work entirely.
As a private drum tutor I had to think quickly about how to continue offering my services and prevent my students dropping off and my income drying up. Sadly some people experienced the latter but a lot of people found their feet quickly and took the journey down the online teaching method. Fortunately, as a fairly tech-savvy guy, I was one of those who hit the ground running and was then able to pass on my experience and knowledge to some of those struggling to get started.
As a hoarder of “useless” music gear (which ordinarily sits collecting dust), I knew I’d be able to figure out a way of providing lessons online if I dug out a few cables from inside junk boxes and gave my mini-mixer a good clean up… It wasn’t quite as easy as that though, which is why I’m putting a blog entry together to help some more people set their businesses up this way!
Now, unless you’ve been living under a rock, you’ve probably heard of a video conferencing software called Zoom. This was something I discovered early on by returning a few decent forum searches and browsing Google for the best recommended software, with other options like Skype and FaceTime not really cutting it…
As drummers we’re very loud and we need something that can handle the audio. I found that some software didn’t have the ability to do that, however Zoom allows you to change the audio settings to cope with the vast dynamic ranges we use.
So I’m going to start off by directing you to Zoom if you don’t have it already:
I’m also going to quickly mention here that for under £15 a month you can get a premium version of Zoom, which doesn’t have any time limits (usually 60mins for calls with more than 2 people) - worth considering for sure!
Assuming you’ve followed the straightforward installation process, I’m now going to show you how your audio settings should look below.
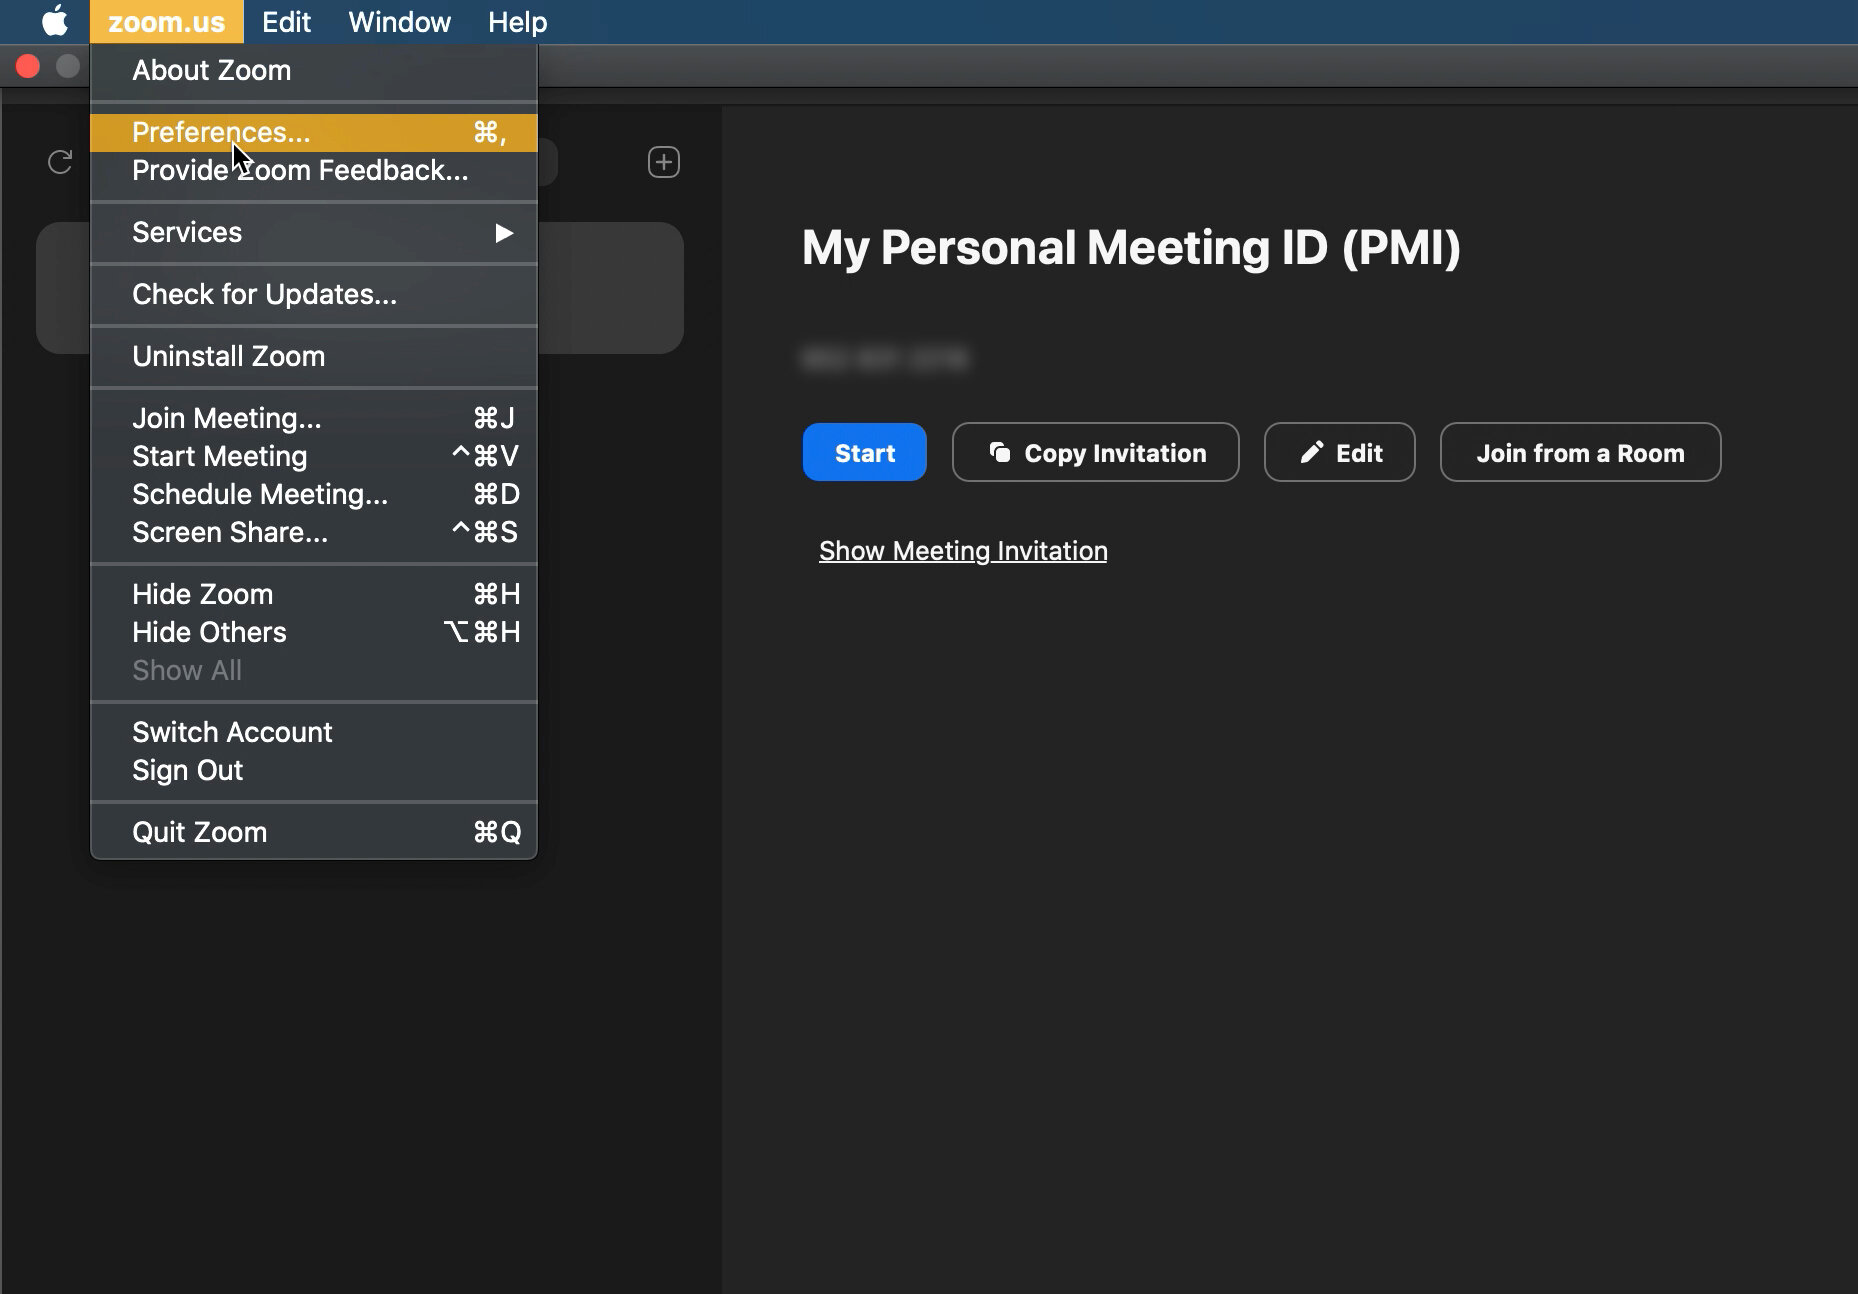
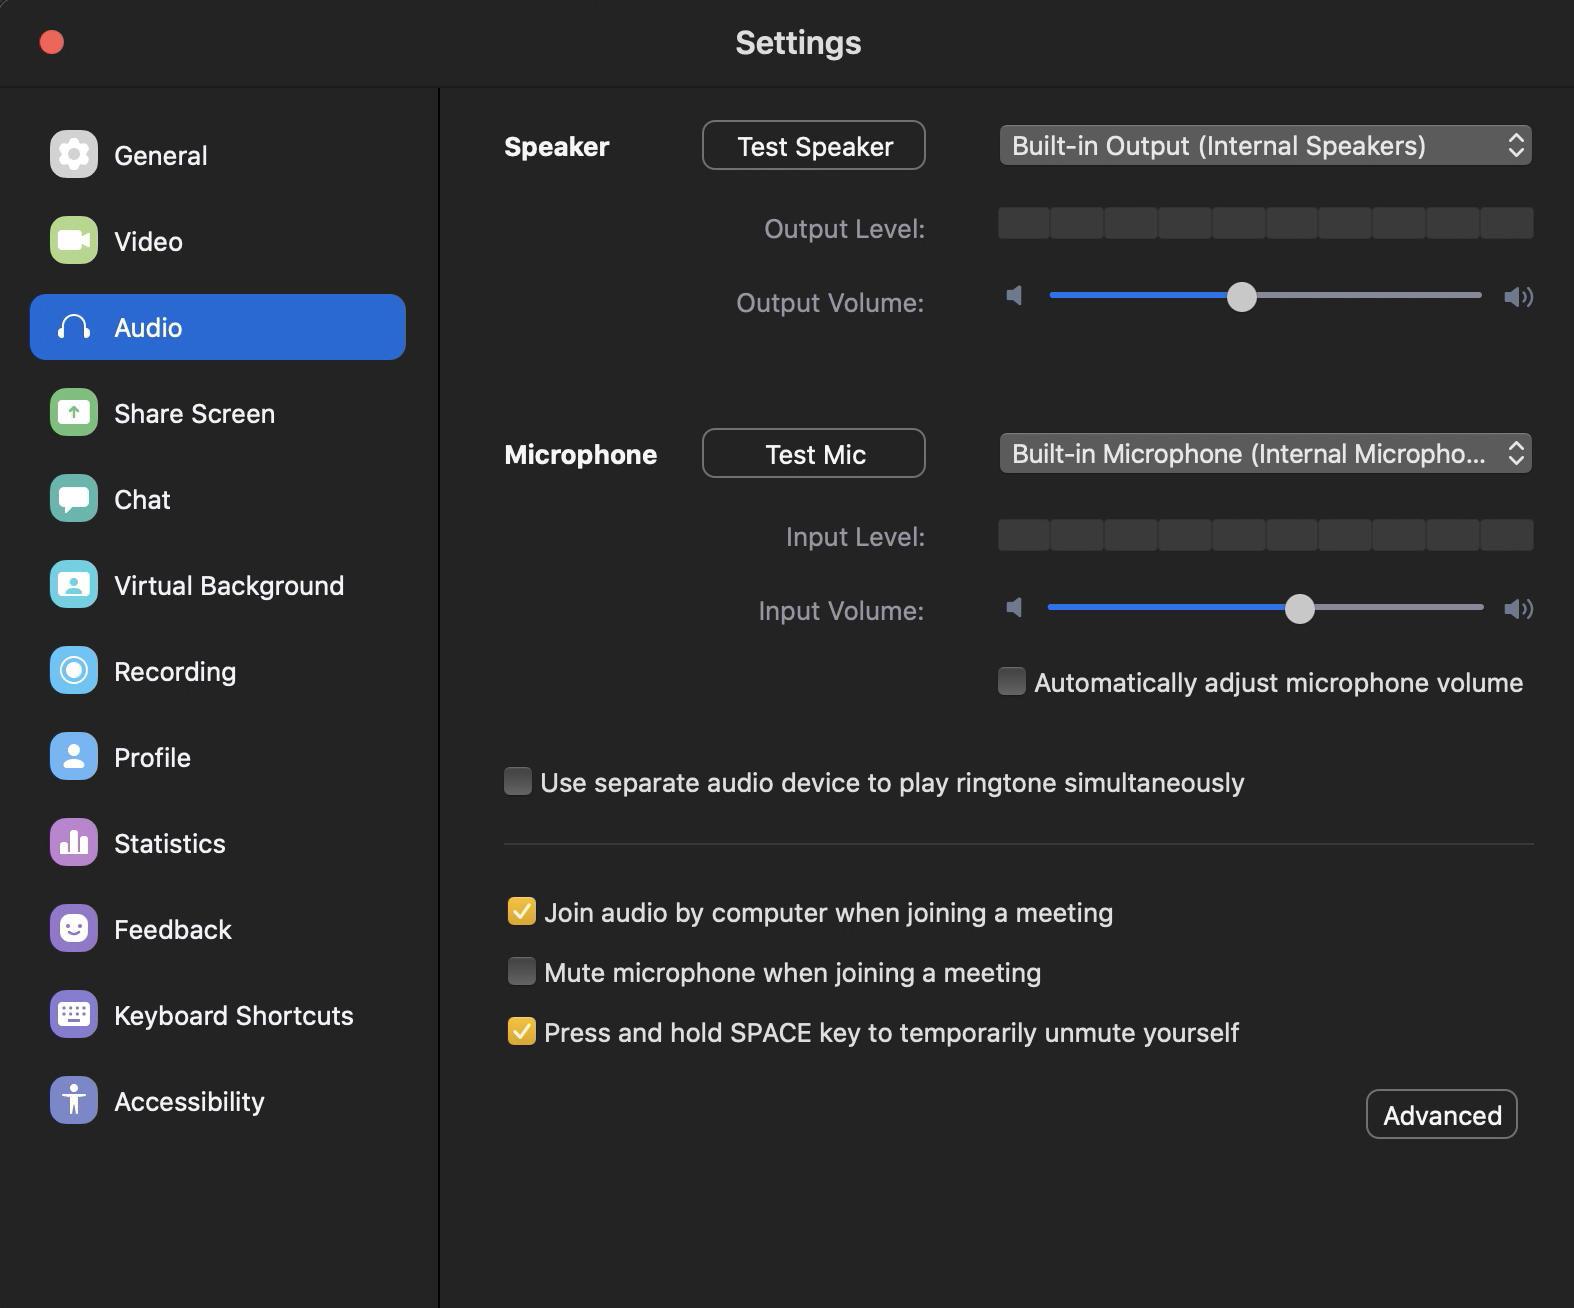
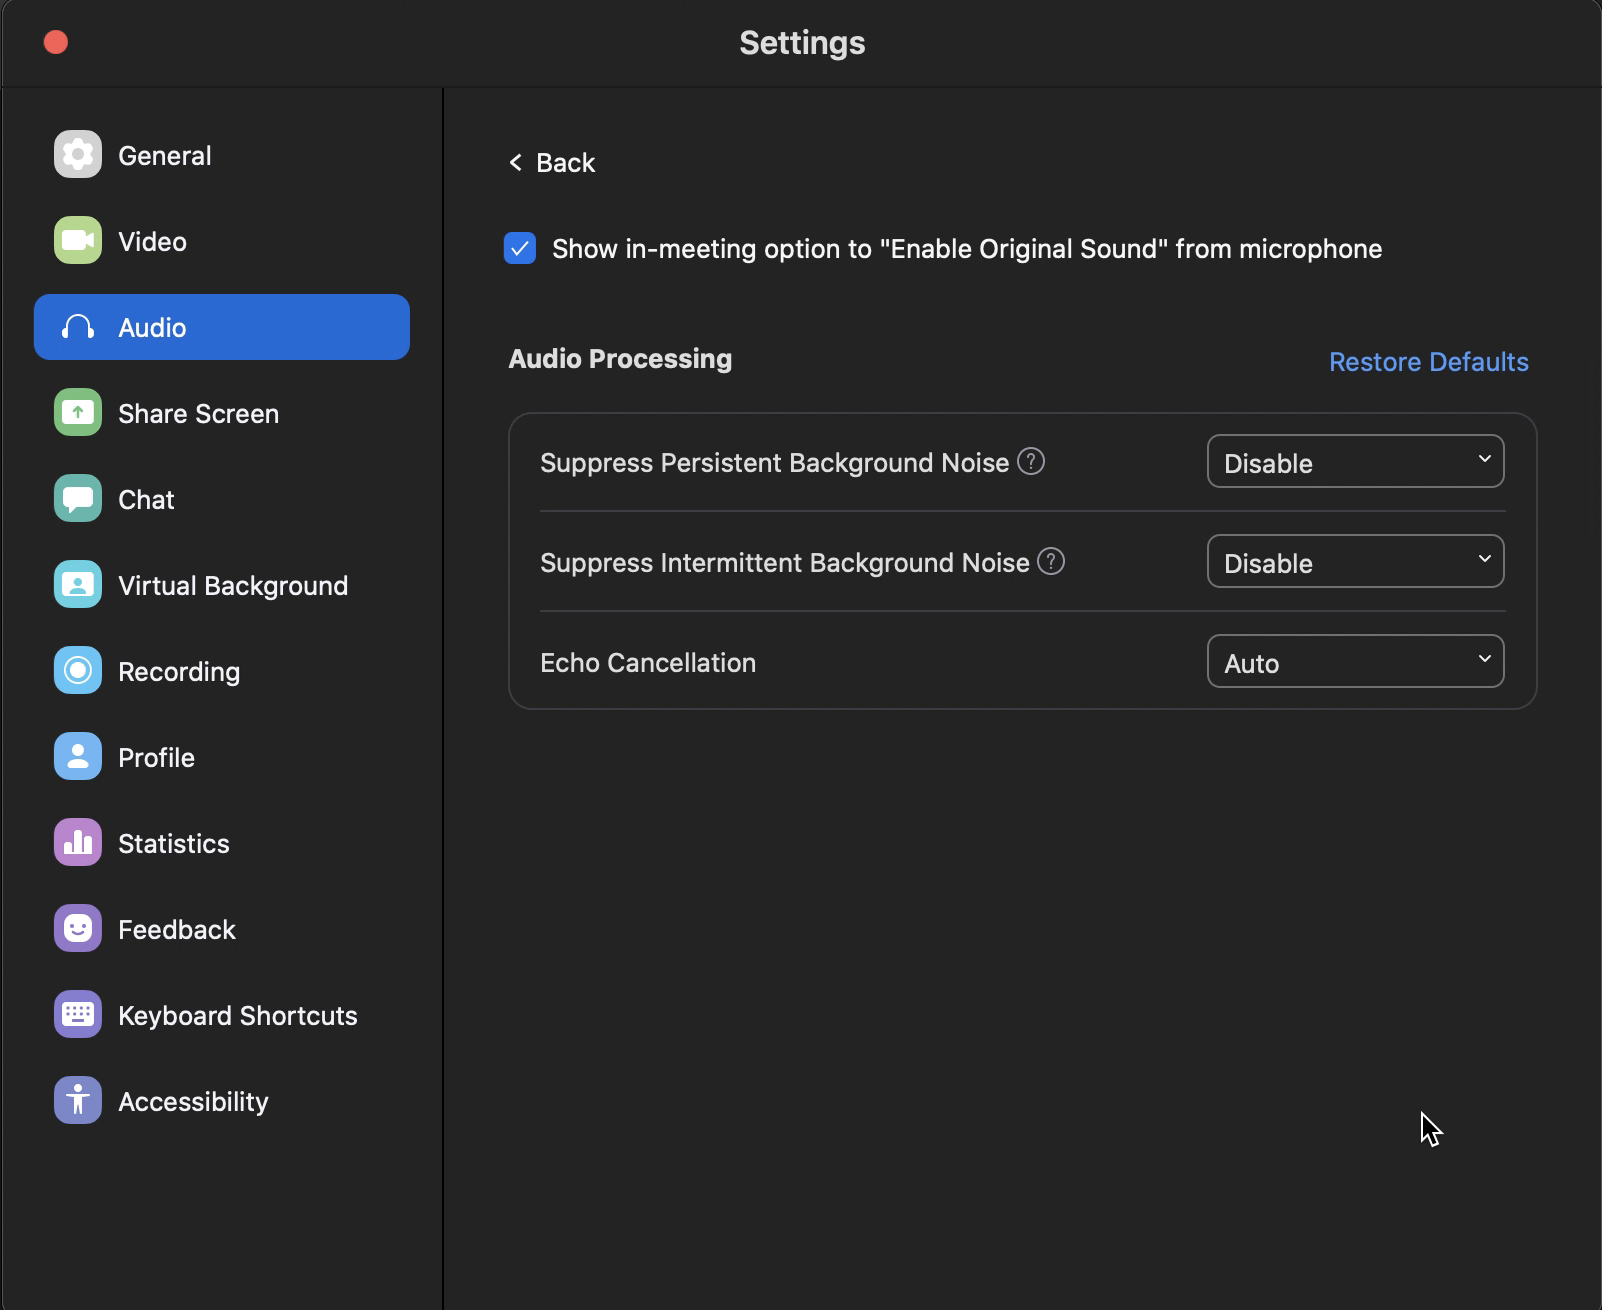
So as you can see, there’s not loads of settings to mess around with. Just set your audio input to whatever you choose to use (drop-down option shown in 2nd image) and then copy the Advanced Settings (as shown in the 3rd image). The important thing when you start a call is to hit the ‘Enable Original Sound’ option that pops up when the call starts.
Zoom is primarily used for business conferences and the default audio settings cut out background noise, which is a NO NO for drummers (imagine losing all of those intricate snare drum ghost notes you’re trying to demonstrate!!) so get these audio settings changed straight off the bat and you’ll be off to a good start.
Right, so that covers the software aspect. You’re going to want to ask your students to configure their software the same way too. I believe laptops and iPads allow you to change these settings but phones don’t (so definitely avoid!)
Next you’re going to want to assess your toolkit. Are you using an acoustic kit or an electric? Can the electric kit plug directly into your computer via USB cable? Does it have some sort of ‘MIX INPUT’ where you can plug a microphone in to use as a talkback mic? We’re going to have to get a bit technical here… I’ve personally used an acoustic drum kit and electronic drums for online lessons, so I’m going to show you my set up for both.
Acoustic Drums

So, what you’re seeing here is the first option I tried.
I had two condenser microphones (AKG C214), one as an overhead picking up all of the drums collectively and one was used as a talk mic. I plugged both of these microphones into a mini-mixer (Mackie 402 VLZ4) and then from the mini-mixer I took a mini-jack output into my computer’s Line-In. This worked pretty well and the sound was clear enough to do the job. Having a mini-mixer enabled multiple microphones and the ability to adjust the levels of each one. You can also scale this option up with bigger desks and more microphones.
The next thing I tried was using my audio interface (Focusrite Saffire PRO 40) with a full set of microphones, close-micing each drum and still using a talk mic. This was a better option and actually worked SO well! If you have access to plenty of mics and an audio interface then this is the road you want to take! Just set your A/I as the input and output in Zoom settings and from there you’ll have studio-quality sound and volume control from your interface.
However, several months into lockdown and with very limited soundproofing, I felt guilty about the amount of time I was playing/teaching whilst all the neighbours were stuck at home listening! So I then moved onto an electronic drum kit setup…
Electronic Drum Setup
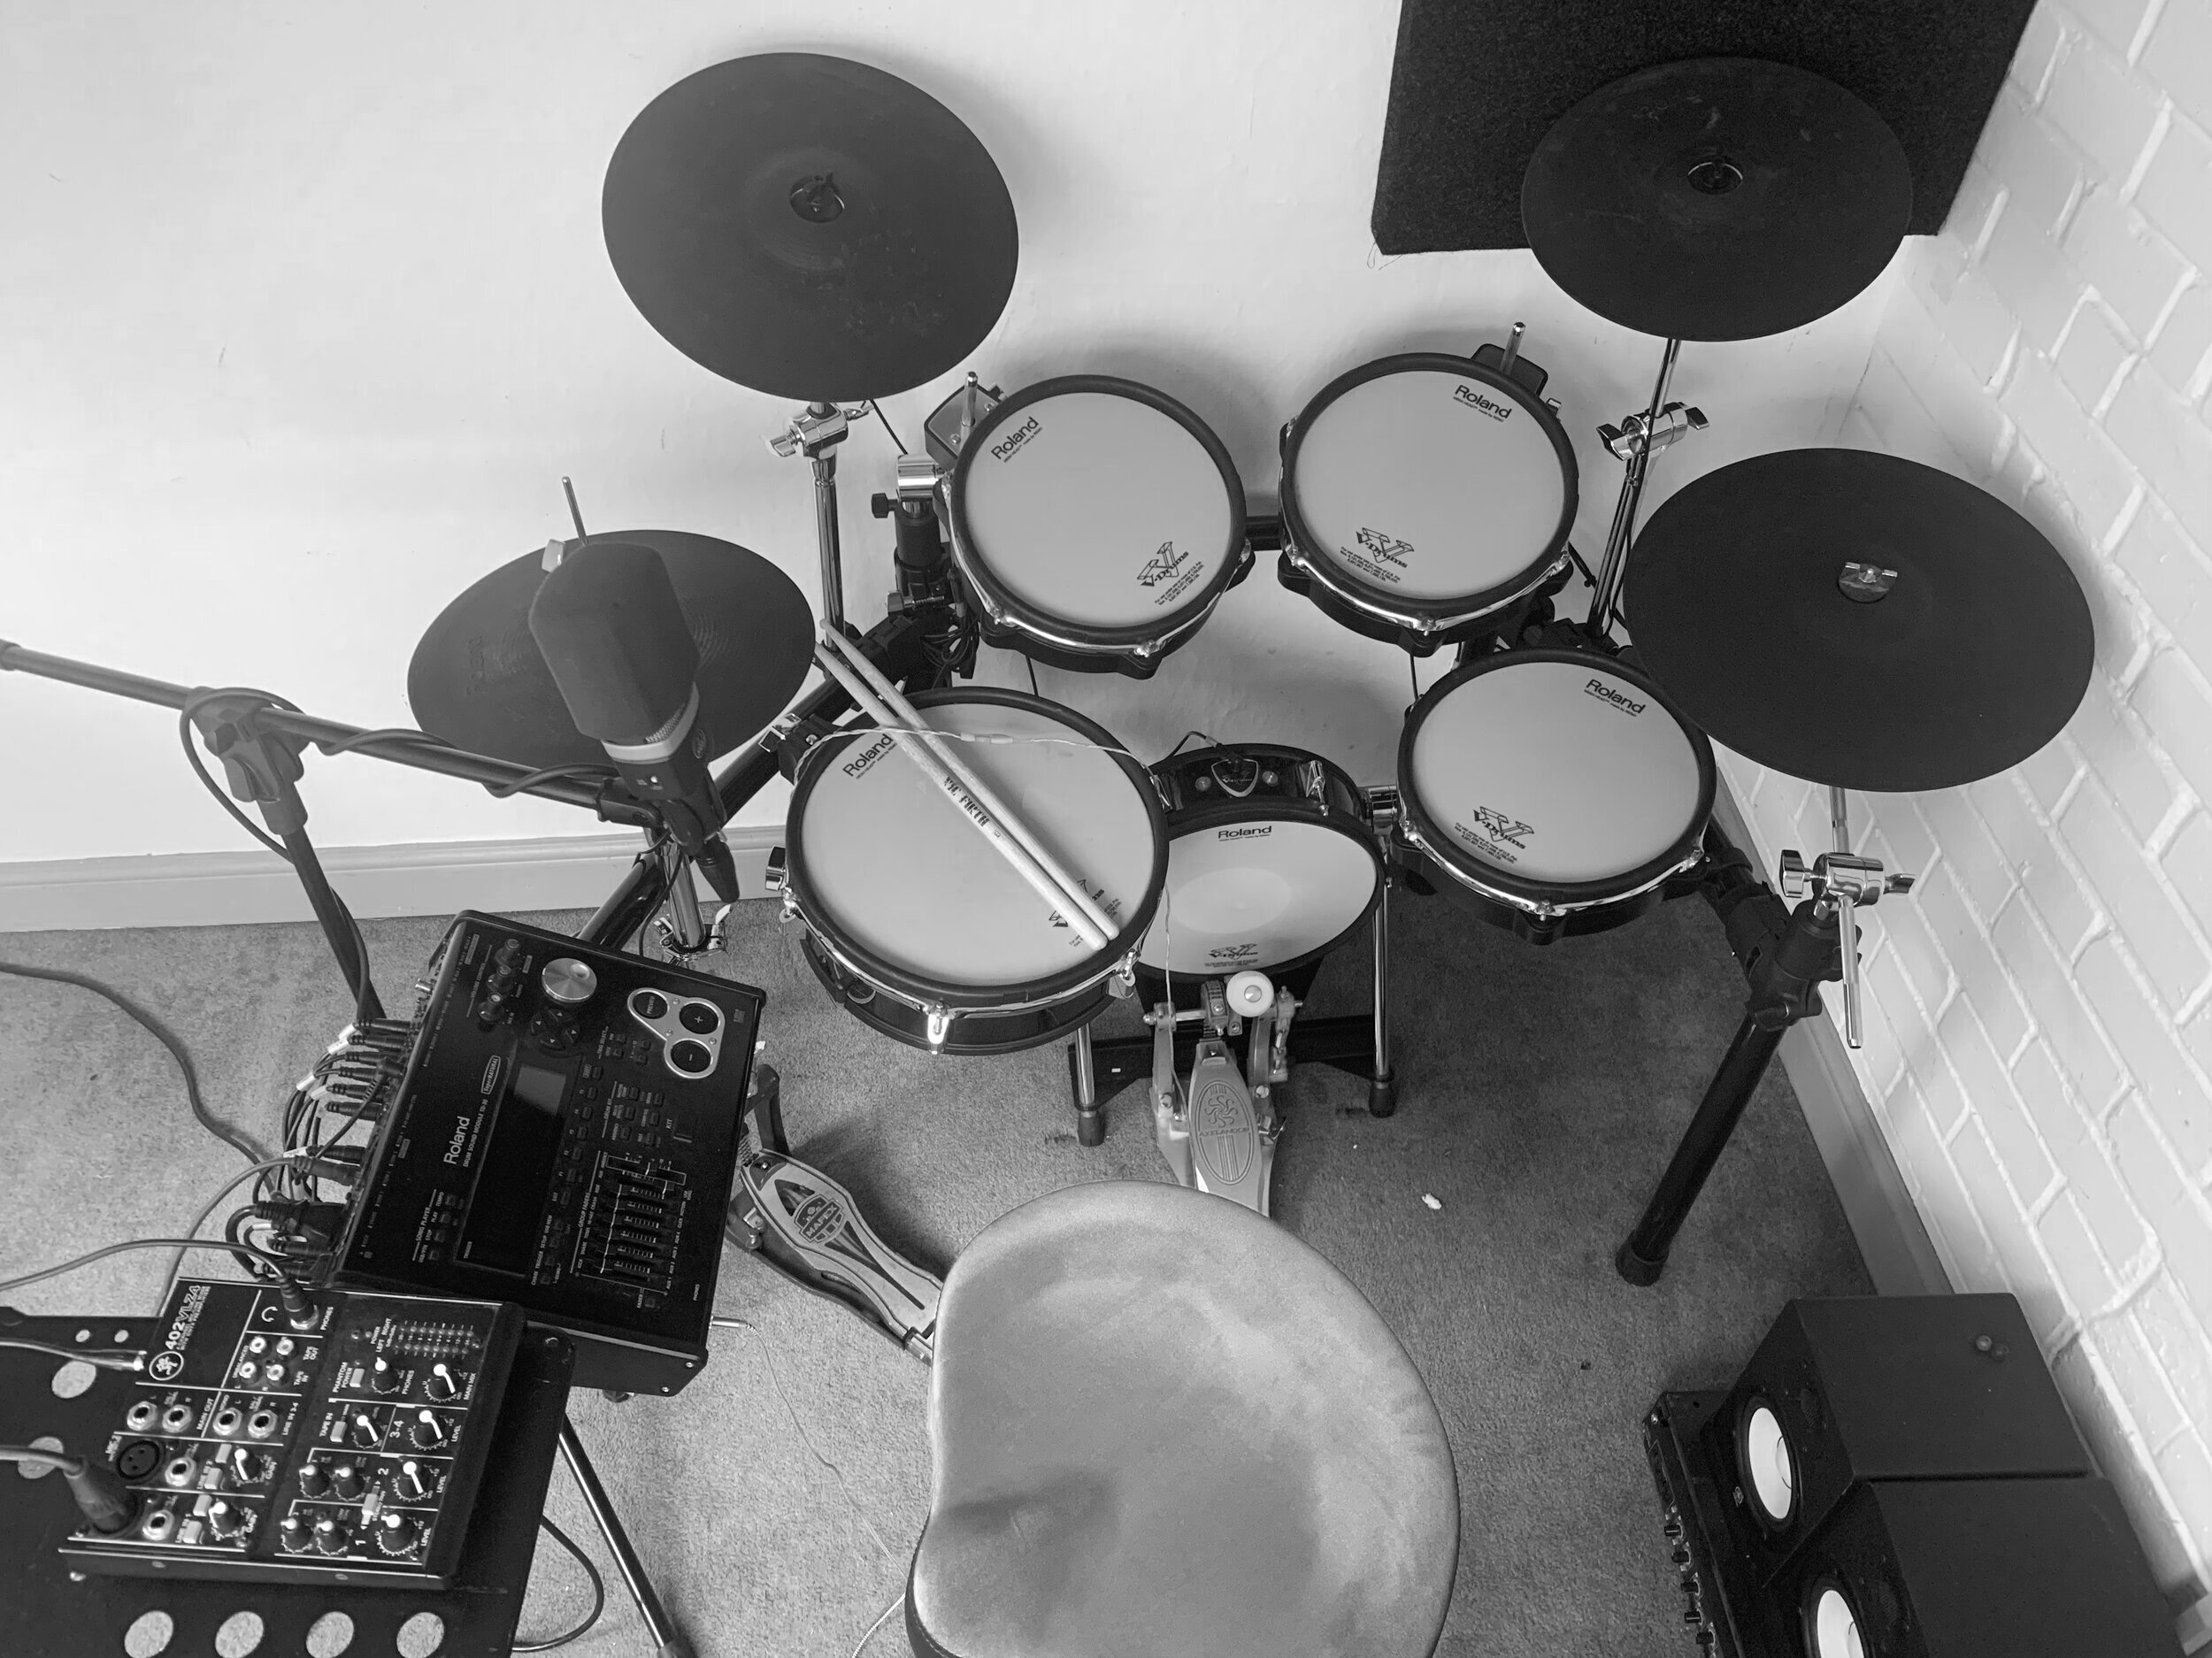
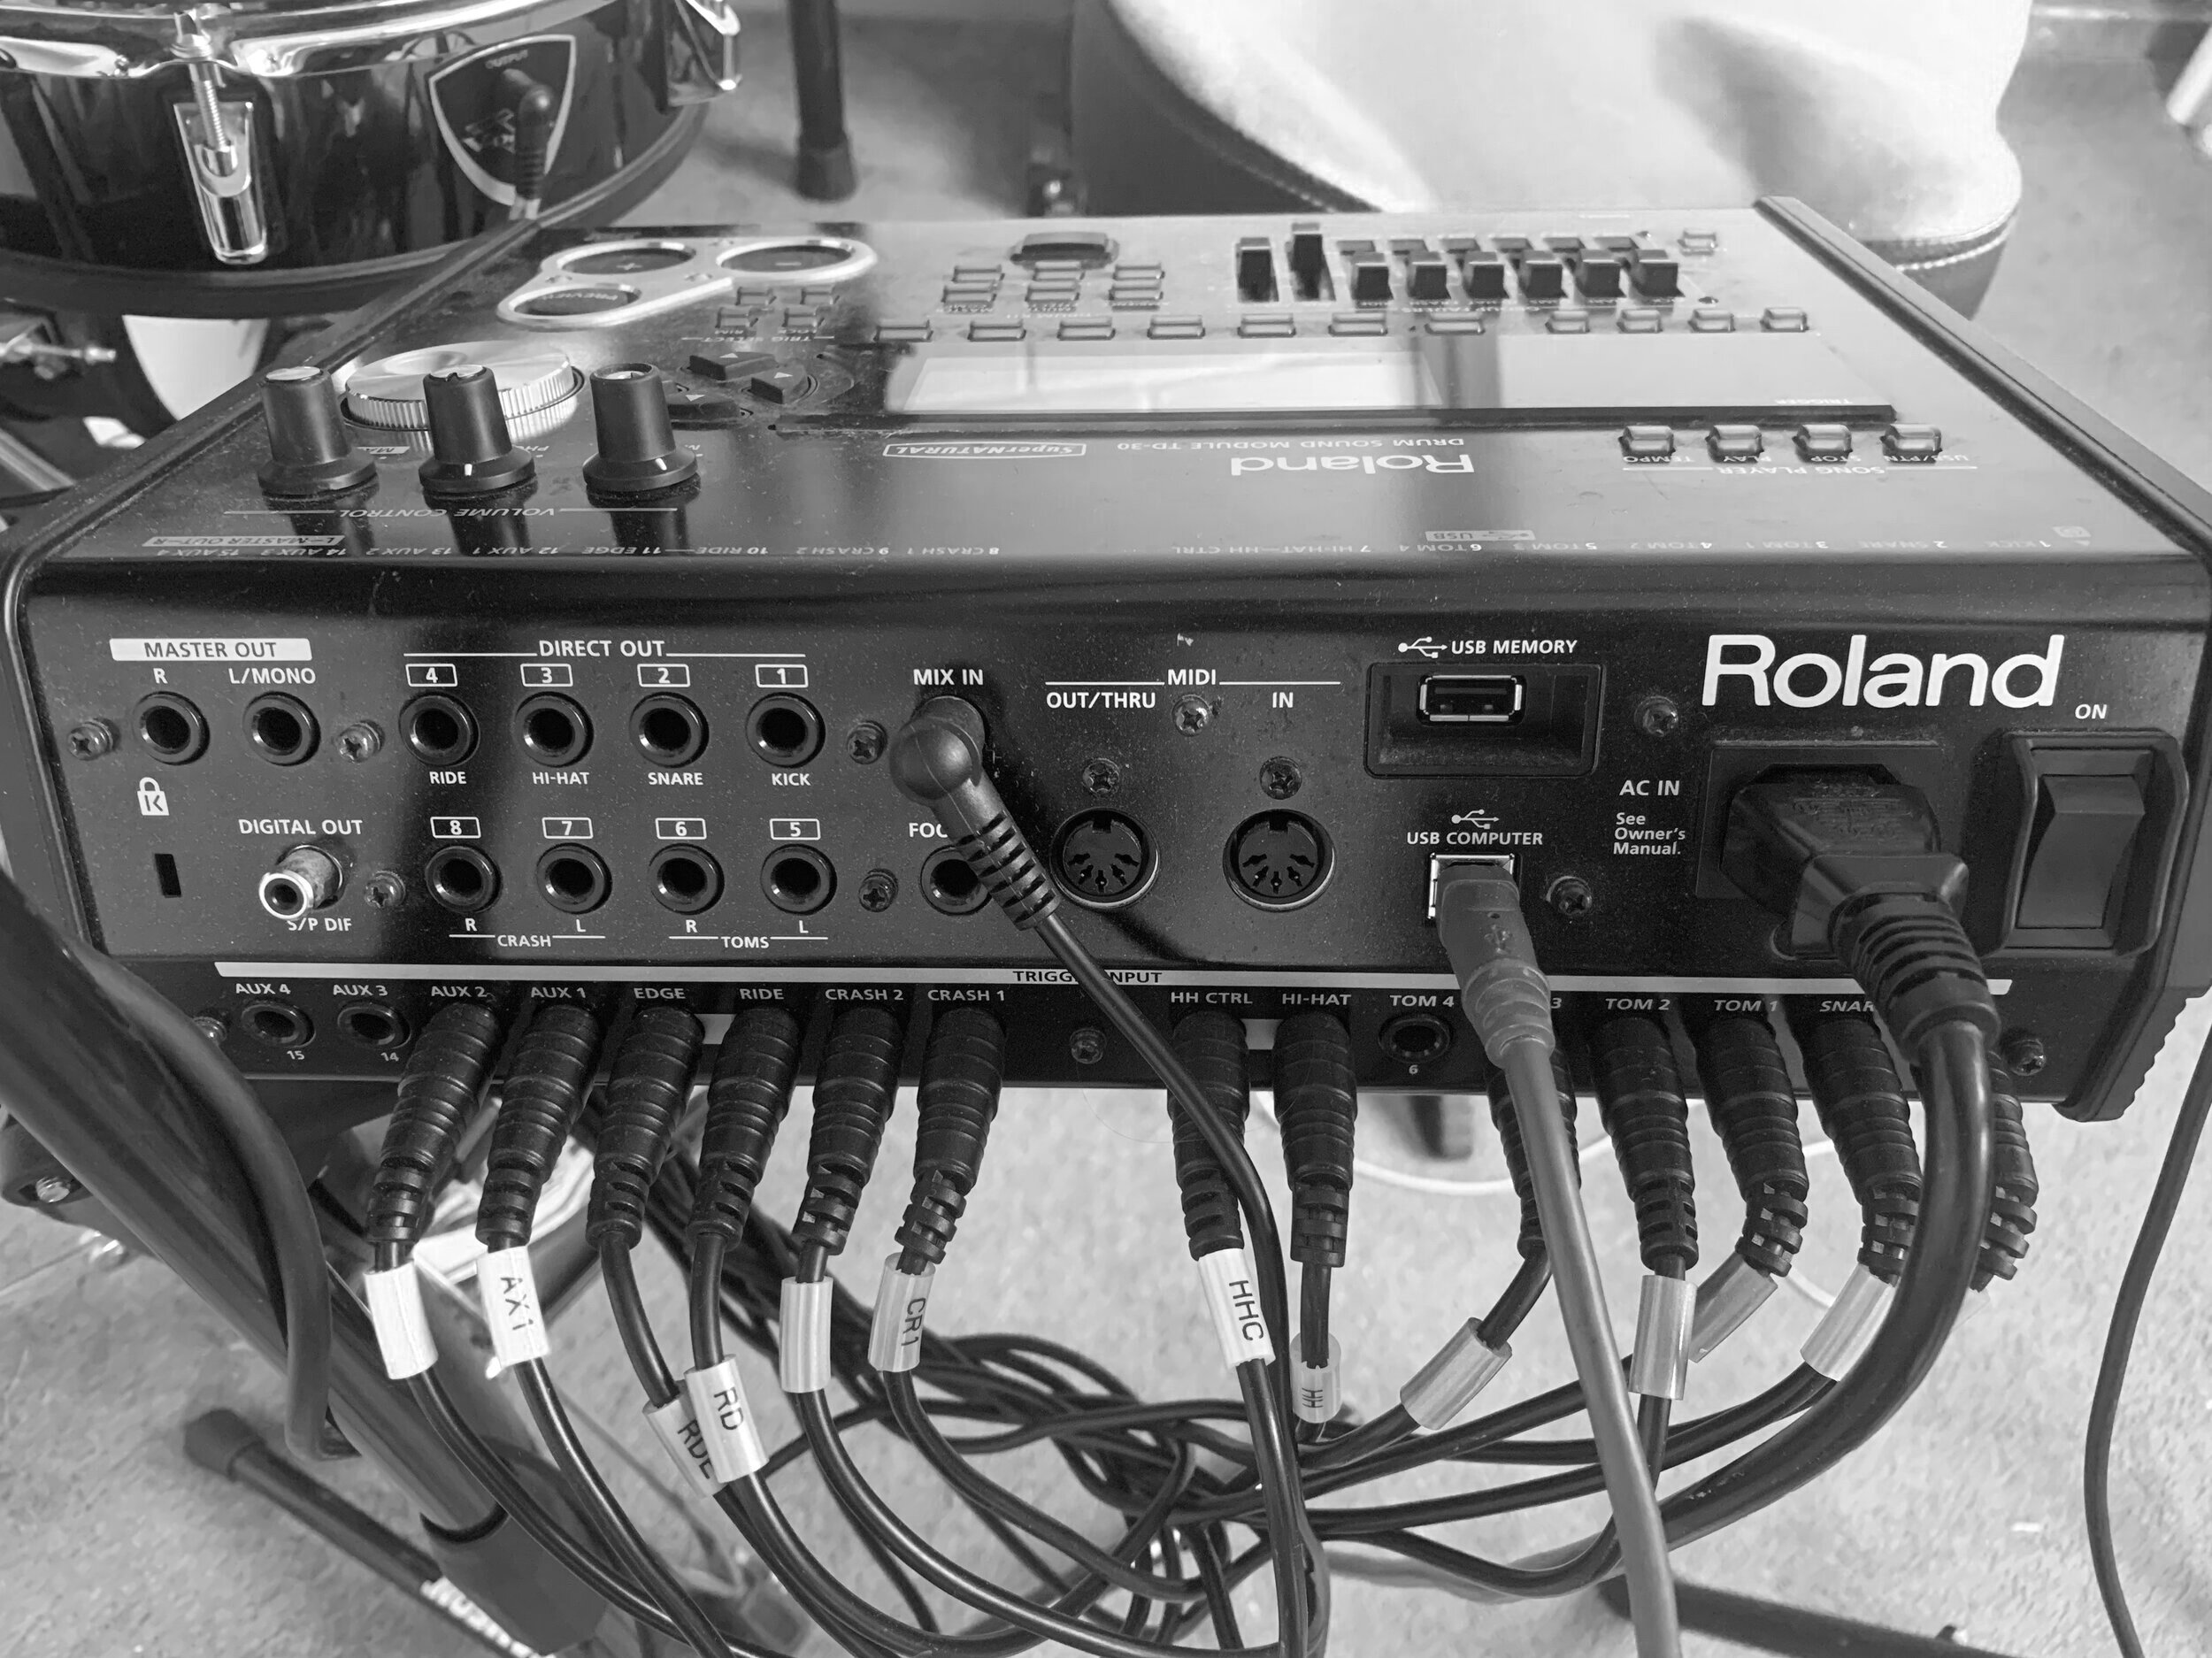
Now you’re looking at a more compact electronic setup here.
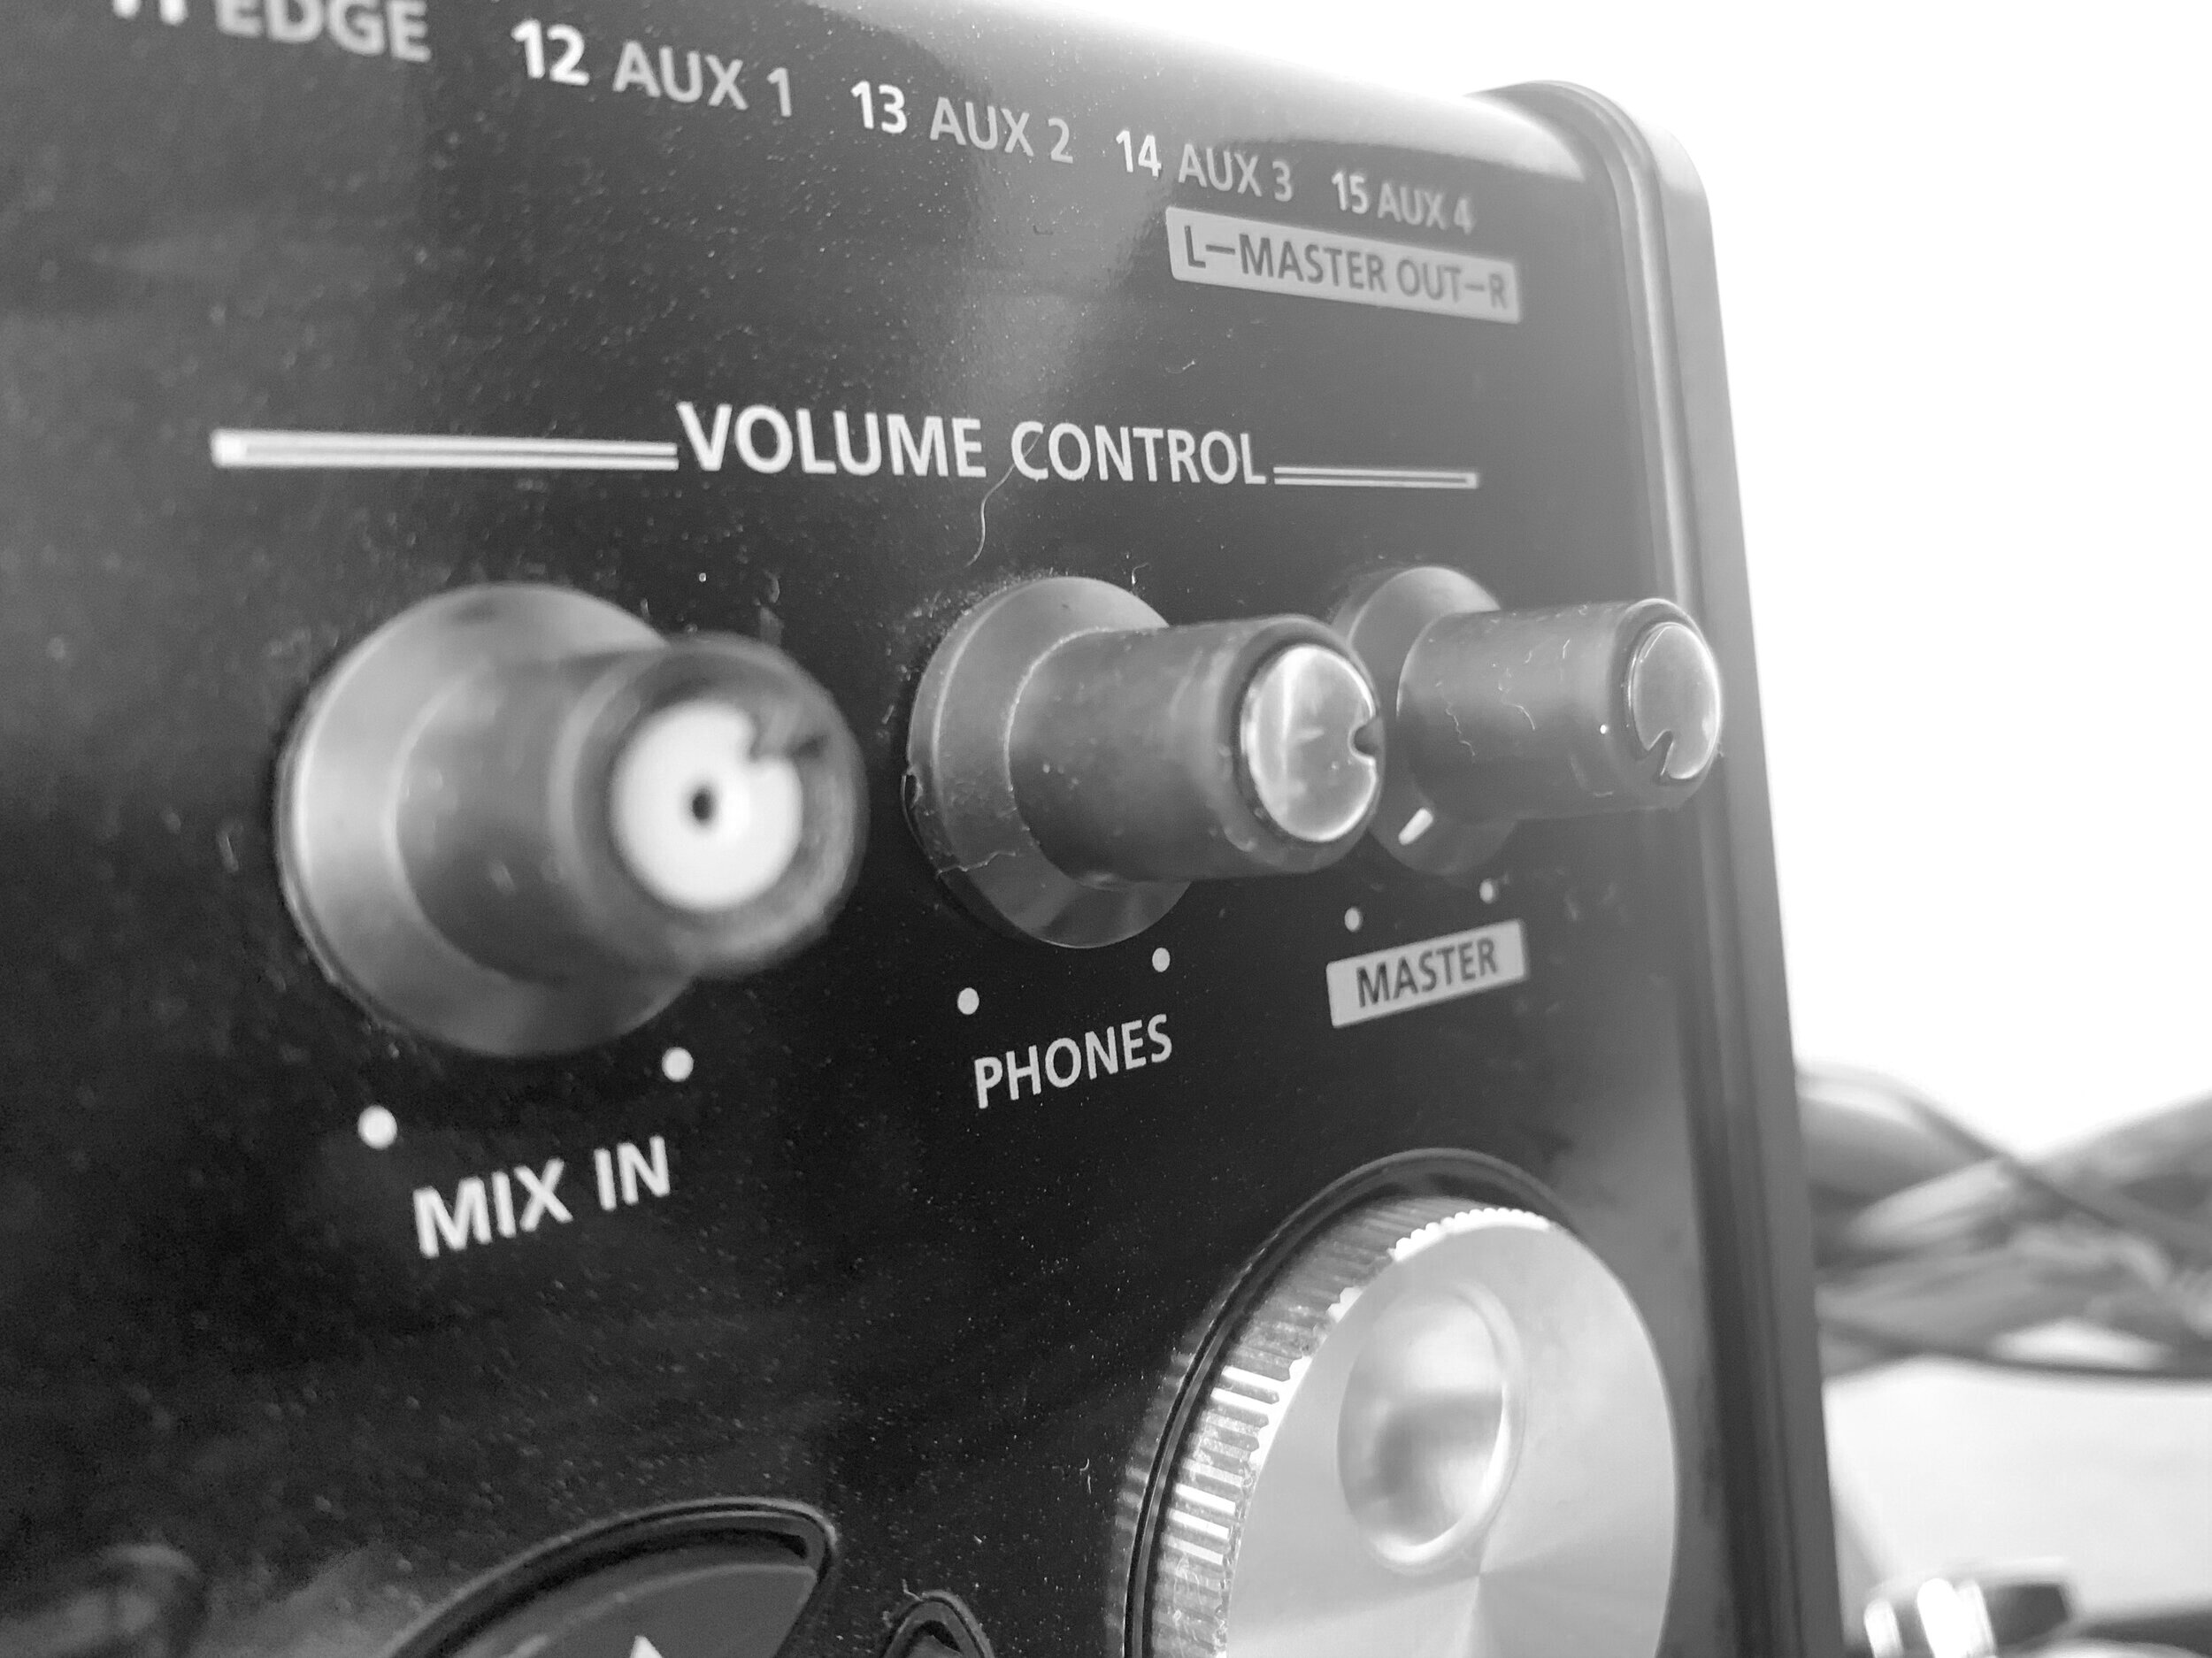
I’m using a Roland TD-30K drum kit along with the Mackie mini-mixer I was using previously, which is now sending the talk mic to the ‘MIX IN’ input on the drum kit module. From there you have control of the microphone volume so you can balance it against the volume of your drums. Then from the drum module I use the USB COMPUTER cable to run into my laptop/computer. Sometimes you have to install Drivers for this, so if it’s not connecting to the computer or showing as an option on your Zoom audio settings then you may have to visit the website for your drum kit brand and download and install the Drivers.
If you’re using a Roland then they’re available here:
https://www.roland.com/uk/support/updates_drivers/
I’m really enjoying this option, as I can keep the lessons entertaining with silly drum samples and I just get a really controlled sound in general.
I’m aware some electronic kits won’t have the ‘MIX IN’ option for a microphone and potentially no USB COMPUTER option either. So, alternatively you could send a Master Out feed from your kit to a mini-mixer/audio interface, plug your microphone into that and then feed it to your computer that way instead. This would also work absolutely fine!
Camera
Most laptops these days have built-in cameras, which work OK for this purpose. I personally just use the one on my laptop, as I haven’t found any need for anything superior yet. However, I have heard that the Razer Kiyo is another excellent HD option for under £100.
Internet Connection
Ahhh here’s the big one that causes the most problems….
You have to have a good internet connection.
If your drum room is a long distance away from your WIFI router then you’re probably going to struggle with connection issues. If you’re like me and you play drums in an outbuilding, then you’ll need to look at WIFI boosters and maybe an ethernet cable too.
I personally bought a NETGEAR Wi-Fi Booster Range Extender EX3700 and linked it to my computer via an ethernet cable, which seems to do the job. However, you can get upgrades to this booster that cover further distances, which may be worth looking at if you’re worried this won’t cut it!
Safeguarding
Last little thing to add here is that teaching online requires you to pay special attention when it comes to safeguarding your students. If you’re teaching young kids and teenagers then you need to make sure that a parent is present or at least within earshot of the call, for their protection and yours. Just make sure you have communicated this with parents beforehand!
And that is pretty much what you need to know to get you started!
Now you’re ready to teach…
Get those lessons scheduled in! You can either add your student email addresses to your Zoom account or you set meeting times and email the Meeting Invite Code to each student ahead of the lessons. Personally I do the latter, as it helps remind students/parents that they have a lesson that day!

One very last note…
Don’t forget that even if you get your setup to look and sound amazing, you’re probably going to experience problems with students not achieving great sound and some with terrible internet connections too. So the more you can prepare them, the better - why not share this page with them? Or write up a set of instructions in advance!
If you’re interested in learning more or you’re still struggling with aspects of setting up, feel free to use the contact page to drop us an email and we’ll be happy to assist!
Going One Step Further…
I’ve been doing this style of teaching for about 5 months and I’m always looking at ways to improve on what I can offer, so here are a couple of cool things I’ve discovered along the way.
Zoom Whiteboard feature
This allows you to draw and type notes for students, which is one of the things I really struggled without, at first… and even when I started to utilise it, trying to draw with a mouse or laptop trackpad was seriously awkward!
A fellow teacher recommended that I create a 2nd Zoom account and join the lesson from an iPad or tablet so I could use a stylus or finger to draw more easily. This is the reason I upgraded to a premium account so I could have two accounts plus the student on one call without any time limits.
It has made a massive difference, so if you’ve got one available to you that you can add to your setup, then give it a go!
Dropbox Folders
So you’ve typed up those lesson notes and you’ve got PDFs that you’ve been working from but now you have to email them to every student after every lesson?
Why not give them access to their own student Dropbox folder and use it as a place to store all the notes? It will save you a bunch of admin time!
Seems like a great option even for face-to-face lessons… less scraps of paper and you do your bit to save the planet!
Written by Drummers Link Founder and Educator, Cameron Stewart-Mathews.